The blank space created in the Exchange database when data is deleted from it is known as white space. White space causes the database to be larger b than it is in the original. This white space within the database but can be reclaimed with new data such as mailbox items. Till then, it is using the disk space which is unnecessary and sometimes causes storage space issues in the Exchange system and database.
There are two ways to deal with the white space:
- Offline defragmentation
- Deletion of the database after migrating mailboxes to a new one
Users can create a new database and move all mailboxes to that database. But this option is viable only when sufficient space is available in Exchange Server to hold a new database. Also, there is a risk of a lot of transactional logging in this case.
So, we are going to discuss a convenient way to release space from Exchange 2013, i.e., offline defragmentation of the database to shrink it.
Offline defragmentation requires database dismount on Exchange 2013 server (mailboxes cannot be accessed during defragmentation). Let us understand the prerequisites to perform the offline defrag:
- Ensure that you have a backup of the database in case of any issues
- Needs ample of space (more than 1 times the size of the database file)
- Basic knowledge of using Exchange Management Shell
STEPS TO PERFORM OFFLINE DEFRAG OF EXCHANGE 2013 DATABASE
In Exchange Management Shell, perform the following steps sequentially:
- Check the available database size in your Exchange database by executing the following command:
Get-MailboxDatabase -Status | FT Name,DatabaseSize,AvailableNewMailboxSpace -Auto. It will display you the database size and available white space in it.
- Next, dismount your database. Run the command Dismount-Database, provide database name as identity and then confirm by entering ‘Y.’

- Now, navigate to your database by running the command cd and providing the EDB file path.

- Run the given Eseutil /d command to defrag the dismounted database.
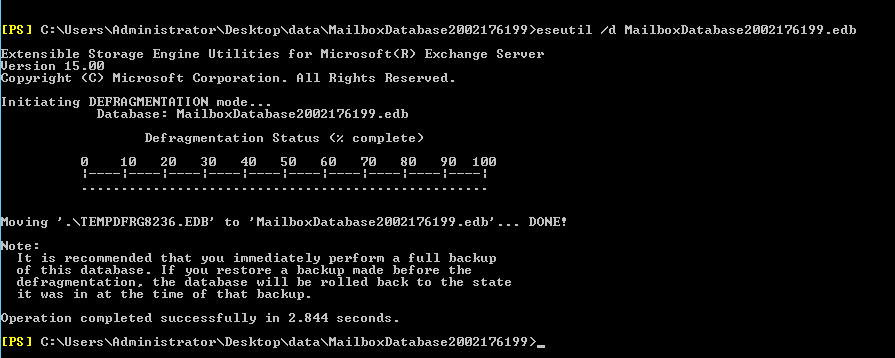
Your dismounted Exchange database is successfully defragged now. - Now, mount your database again with the Mount-Database command (providing database name as Identity).

Once your database is mounted again and has become accessible, you can again check its available size with the same command:Get-MailboxDatabase -Status | ft name,databasesize,availablenewmailboxspace -auto. You can see that the file size has been reduced.
SOURCE: https://www.kerneldatarecovery.com/blog/remove-white-space-from-exchange-2013-database/ (2021)


Useful info. Fortunate me I found your website unintentionally, and I am surprised why this coincidence did not came about in advance! I bookmarked it.
Thank you and looking forward to hearing from you more.